Securing your website with an SSL certificate is no longer optional—it’s essential. Thankfully, Let’s Encrypt offers a free, fast, and reliable way to encrypt your site with HTTPS. Managed by the non-profit Internet Security Research Group (ISRG), Let’s Encrypt provides SSL certificates that are trusted by all major browsers. If you’re using cPanel, the installation process is straightforward and takes only a few minutes. In this guide, we’ll show you how to install Let’s Encrypt SSL in cPanel quickly and correctly.
Quick Steps
- Log into your cPanel account
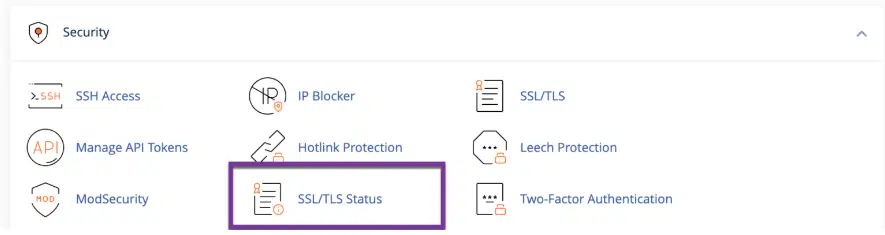
- Navigate to SECURITY > SSL/TLS Status
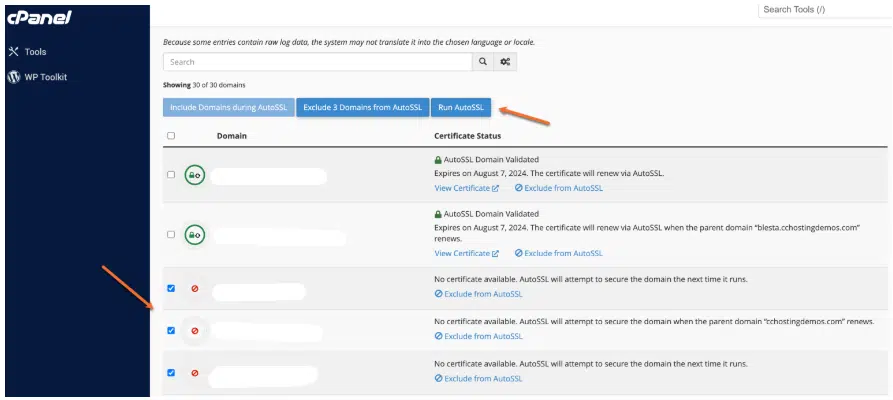
- Select your domain(s) and subdomain(s)
- Click Run AutoSSL to issue and install the SSL certificate
- Confirm the green padlock icon to verify the certificate
- Set up automatic HTTPS redirection for secure access
How to Install Let’s Encrypt SSL in cPanel
Before diving into the installation process, it’s important to ensure your domain is properly configured. Your main domain and its www subdomain must both point to your hosting server’s IP address. If they don’t, Let’s Encrypt won’t be able to validate the domain, and the SSL installation will fail.
Additionally, if you’re using parked domains (aliases) linked to your primary domain, make sure they also resolve to the same server. cPanel includes all parked domains in the AutoSSL process, so any misconfigured one could cause the entire SSL request to fail. If needed, remove misconfigured parked domains temporarily until the certificate is installed.

If you have any web hosting questions please feel free to reach out to us. We're happy to help.
Shared Hosting | Reseller Hosting | Managed WordPress Hosting | Fully Managed VPS Hosting
Our Guiding Principles
- Provide consistent, stable, and reliable web hosting services.
- Ensure rapid ticket response and quick resolutions to issues.
- Never saturate or over-provision servers to ensure stability and speed for our customers.
- Use only high-quality enterprise-class hardware to ensure minimal downtime from hardware failures.
- Provide clear pricing with no hidden fees or gotchas.